CMSDAS Pre-Exercise 4: Using git
Overview
Teaching: 0 min
Exercises: 30 minQuestions
How do I setup git on my computer/cluster?
How do I collaborate using GitHub?
Objectives
Setup your git configuration for a given computer.
Learn how to make and commit changes to a git repository.
Learn how to create a pull request on GitHub.
Submit your answers
Work through the Question 4.x boxes on this page, then enter all your answers in the CMSDAS@LPC2027 answer form for Episode 4. You can resubmit at any time; we keep your latest answers. Stuck? Ask on Mattermost.
Introduction
This exercise walks you through the standard GitHub “fork and pull” workflow: copy a repository, make a change, and propose it back as a pull request. It is a condensed version of the CMSGitTutorial. If you’ve never used git or other version control, read at least the first set of its slides first.
Prerequisite
You need a GitHub account with SSH keys set up, as described in the setup instructions. Choose your username wisely: it appears on all your contributions to CMS code. If yours is something like
edgelord1337, consider changing it or making a second account.
Configure git
Tell git who you are. Do this on every computer you develop on (cmslpc, your laptop, …), replacing the [brackets] with your details and GitHub username:
git config --global user.name "[Name]"
git config --global user.email [Email]
git config --global user.github [Account]
Check the result with cat ~/.gitconfig; it should contain a [user] section with these three values.
Optional settings
# Your preferred editor for commit messages
git config --global core.editor [your preferred text editor]
# Make `git push origin` push the current branch
git config --global push.default current
# `git lol`: a compact, graphical log
git config --global alias.lol 'log --graph --decorate --pretty=oneline --abbrev-commit'
# Shortcuts such as `git clone github:GitHATSLPC/GitHATS.git`
git config --global url."git@github.com:".insteadOf github:
git config --global url."ssh://git@gitlab.cern.ch:7999/".insteadOf gitlab:
The GitHub interface
Open the GitHATSLPC/GitHATS repository and click around:
- Top left: Code, Issues, Pull Requests, Actions, Projects, Wiki, Security, Insights

- Top right: Notifications, Star, Fork

- On the Code page: commits, branches, releases, contributors

Fork and clone
Click Fork (top right) on GitHATSLPC/GitHATS to make your own copy under your GitHub account. Then clone your fork, on cmslpc or your laptop, and look around:
mkdir scratch
cd scratch
git clone git@github.com:[user]/GitHATS.git
cd GitHATS
ls -a
git branch -a
Expected output
ls -ashows the files plus a.gitfolder, which holds the full history of the repository:. .. .git README.md standard_model.md
git branch -ashows you are onmain, the repository’s default branch, plus the branches on GitHub:* main remotes/origin/HEAD -> origin/main remotes/origin/atlas_discovery remotes/origin/cms_discovery remotes/origin/dune_discovery remotes/origin/main
Remotes and synchronizing
A remote is a copy of the repository elsewhere. git clone creates one called origin, pointing to your fork.
Add a second remote, traditionally called upstream, pointing to the original repository:
git remote add upstream git@github.com:GitHATSLPC/GitHATS.git
git remote -v
Expected output
origin    git@github.com:[user]/GitHATS.git (fetch)
origin    git@github.com:[user]/GitHATS.git (push)
upstream  git@github.com:GitHATSLPC/GitHATS.git (fetch)
upstream  git@github.com:GitHATSLPC/GitHATS.git (push)
Before making changes, bring your copy up to date with upstream (someone may have changed it), and push any updates to your fork. Here, both will just report that everything is up to date.
git pull upstream main    # same as: git fetch upstream main; git merge upstream/main
git push origin main
Make and commit a change
Make your changes on a separate topic branch. This keeps main in sync with upstream and lets you work on several changes at once.
git checkout -b MyBranch
Edit standard_model.md and add a row for a new particle, the Giton: symbol G, spin 2, charge 0, mass 750 GeV.
(Any resemblance to real or imaginary particles is entirely coincidental.)
Look at what changed:
git status      # which files changed
git diff        # what changed in them
Expected output
git statuslistsmodified: standard_model.mdunder “Changes not staged for commit”.git diffshows your new line with a+:+| Giton | G | 2 | 0 | 750 |
Stage the change (choose what goes into the next commit), commit it to your local repository, and push the branch to your fork:
git add standard_model.md
git commit -m "add Giton to standard model"
git push origin MyBranch
Expected output
The push ends with a link for opening a pull request:
remote: Create a pull request for 'MyBranch' on GitHub by visiting:
remote:      https://github.com/[user]/GitHATS/pull/new/MyBranch
...
 * [new branch]      MyBranch -> MyBranch
Make a pull request
A pull request (PR) proposes your change for inclusion in another repository.
Open the link printed by git push (or your fork’s page on GitHub). You can send a PR to any fork and branch of the repository:
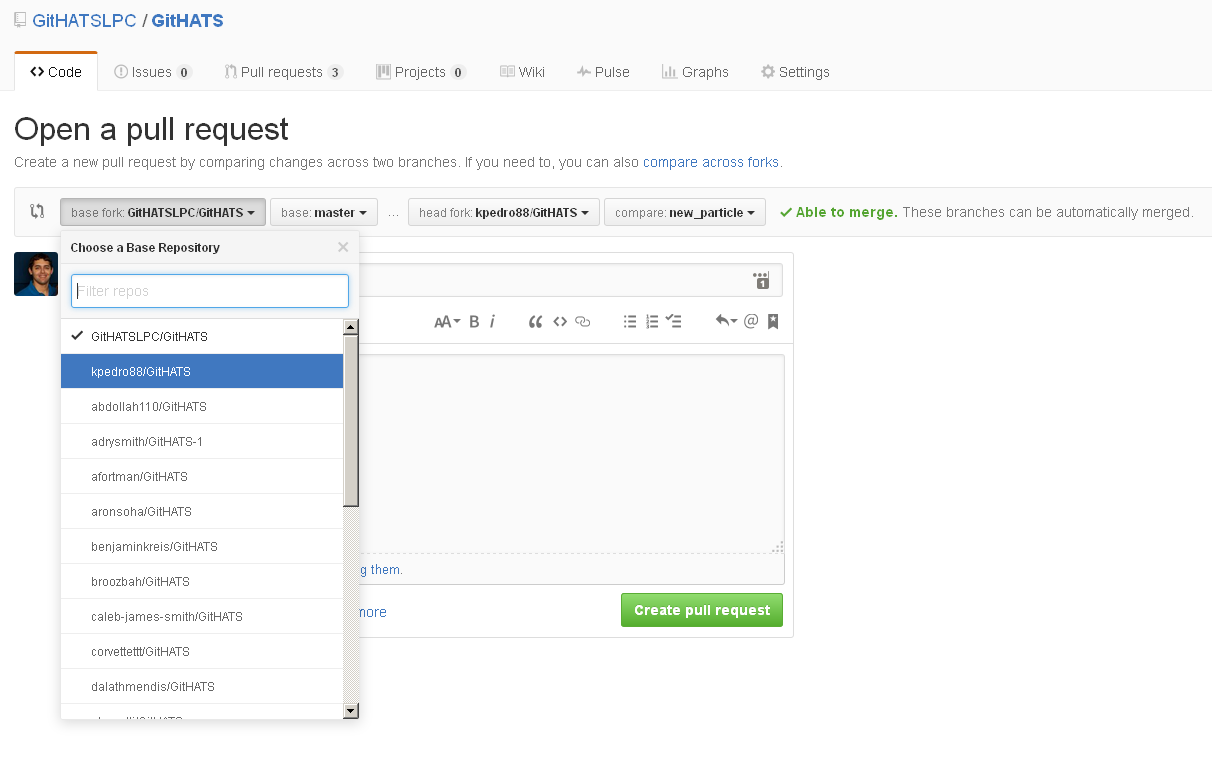
Send it to the main branch of the upstream repository (GitHATSLPC):
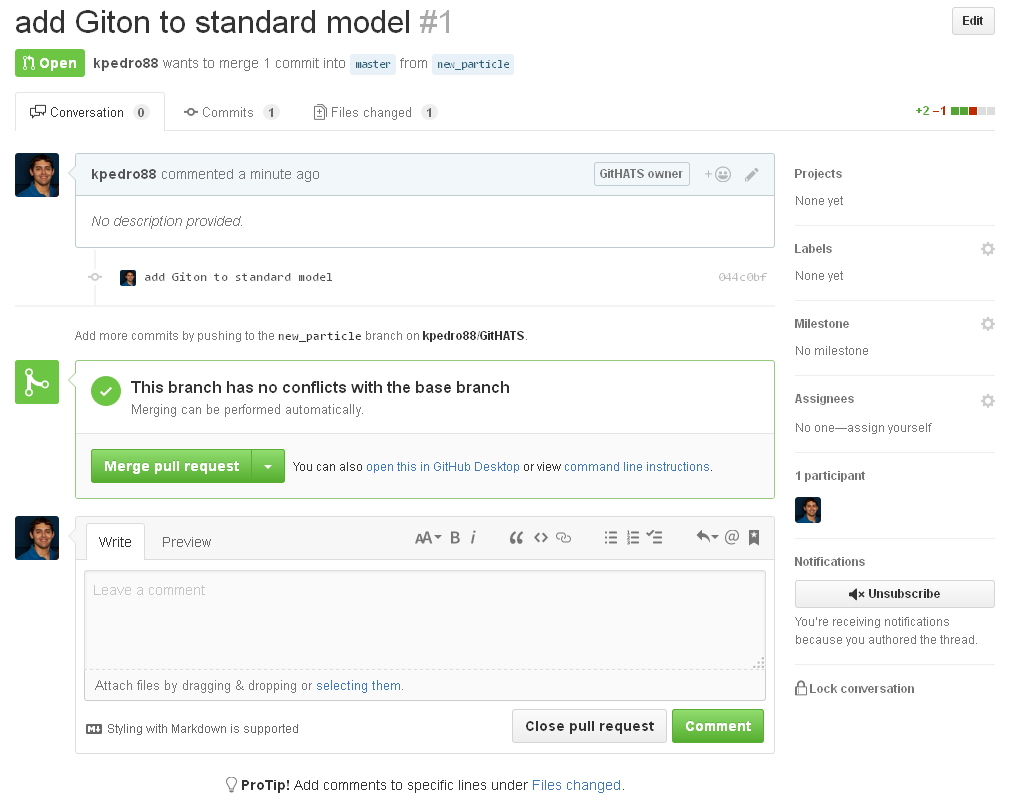
Question 4.1
Enter the link to your pull request in the answer form.
Optional: go further
- To practice merging, send a pull request from
MyBranchto your own fork’smainbranch and merge it.- Not covered here: rebasing, cherry-picking, undoing changes, and CMSSW-specific git usage. Learn more from the CMSGitTutorial, the HSF training modules, and the Pro Git book.
Key Points
Interact with your git configuration using
git config --global.Use the
git clonecommand to obtain a local copy of a git repository.Add and interact with new remotes using the
git remotecommand.Use the
addandcommitcommands to add changes to the local repository.The
pullandpushcommands will transfer changes between the remote and local copies of the repository.